My Workflow
I'm often asked how I make these panoramas.
It's not at all an easy question to answer in a few sentences.
Any attempt at detail can easily get far too long and rambling; potentially spoiling a good coffee or whisky.
So for anyone vaguely interested, here is an overview of my workflow. Read this first and then get back to me for detail 😎
Please bear in mind, it's very much a moving feast. My 'workflow' (not sure if I really like that word) changes all the time. Kit, software, and technique gets, mostly, better every year. So this is, more or less, what I'm doing at the moment.
Background
The goal of all this for me is to end up with an image which can be viewed and interacted with on some kind of screen, handheld or desktop, rather than printed on paper. I feel that the moving image and the ability to zoom in and out can really take people to that place in their minds. Being a still image, not video, it's possible to linger and slowly soak in the atmosphere of a place too.
I like to take the photographs in places that mean something to me - great places for rock-climbing, walking or sea-kayaking for example. This can be quite powerful if what you've taken a panorama of has gone or disappeared.
I took some film-based cylindrical panoramas a long time ago of our really old, falling down kitchen extension (no, they're not on-line). We hated that kitchen extension, but it was quite a while before we were in a position to knock it all down and build something fit for purpose. It's very spooky now playing with those images on the computer, to revisit the horror in such detail! 'Point is, it's no longer possible to go back and re-shoot those images.
I aim to capture the whole scene around me as a Sphere. The actual file I end up with is a rectangle in a 2:1 ratio and goes by the grand title of an 'Equirectangular' image. This is engineered to be able to be draped perfectly over a sphere. So, in other words, it's only possible to see the sphere on a dynamic computer screen.
The 2:1 rectangle is the standard image format for all current 360° imaging, still or video. It can be anything from jpeg, tiff, hdr, exr or video. It's what we photographers work with, but not what's seen by the end user at all.
Note: it's possible to trim the Equirectangular image and print parts of it if needed.
An optional added complication is I can take a number of different exposures to produce a 'High Dynamic Range' image which captures all of the light values at the time. The final HDR image cannot be viewed on any device at all, and has to be 'developed' or Tone Mapped into an ordinary 'Low Dynamic Range' (LDR) image for us humans to view on paper or screen.
Note: the use of HDR stirs up debate in photographic circles almost unlike any other topic. My take on it is: all the HDR capture process does is let you record all the light values in any scene very accurately. That is, you capture all the detail in the darkest shadows and the brightest highlights.
When you get back home it's entirely up to you what you do with the information. It's your choice whether you use the data to just lighten the shadows a bit, darken the clouds a bit, or go mad and create a totally surreal landscape that didn't actually exist in nature. This is clearly the photographer's choice, don't blame HDR!
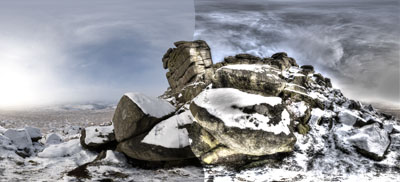
An example of Real 😃and Surreal 😈 HDR
1 - taking the photos
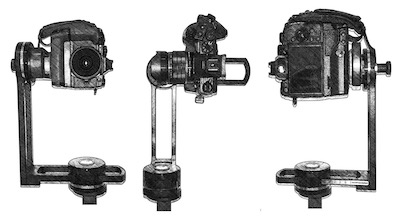
I use a digital mirrorless camera with a fisheye lens. It's mounted on a rather special panoramic tripod head beautifully made by Matthew and Stuart of 360Precision in Oxford.
This lets the camera rotate about its 'Entrance Pupil' or 'Optimal Stitching Position'. Which is where the light rays cross over inside the camera. Rotating about this point means photographs are easy to stitch together in the computer afterwards.
Currently with this kit I take 6 photographs in a circle around the tripod, one upwards and sometimes, one or more downwards. You have to be mindful not to take any photos of shadows of yourself or your tripod carrier (the 'TC').
Note: both you and the TC have to perform the 'Panoramic Tripod Dance' staying behind the camera all the time. The TC can often get bored, or even vaguely annoyed with too much of this. So much so that on your next panoramic expedition you may end up being both the photographer and the TC…
The camera is mounted vertically and all the controls set to manual: focus, exposure and white balance. The aperture is stopped down to maximise the depth of field. But not too much or you'll get diffraction effects! The focus can be set to the 'hyperfocal' distance for your particular lens and aperture.
That's up to 10 photos to create the Equirectangular image. If I choose to shoot HDR, which is almost always the case outdoors, then I have to shoot a range of exposures, varying the shutter speed, not the aperture. HDR is really very handy for 360° panoramas as the range of the light from the brightest bits to the darkest can easily exceed the dynamic range of any camera available in the market today. My shiny new camera can be set to capture 7 images in 2ev steps at the press of one button.
Believe me, this is really very good. With my old camera I had to rotate the shutter speed dial myself, and it was so easy to get wrong. A disaster if you find this out after you get back home. So that's potentially 10 x 7 = 70 images per panorama. Lucky that memory cards are big and cheap these days.
Note: If you bracket with 3 images you are only really creating a 'medium dynamic range' image. The minimum is 5 with 2ev steps in-between. My camera does 7, with 2ev gaps. This guarantees capturing as much of the range of light as possible. Though Ansel Adams did talk about 9 light zones :-) When I get home I can discard any sets that are over-exposed.
Note: if you choose to use a less extreme lens than a fisheye, say a more normal wide-angle lens, all you're doing is increasing the number of photos you have to take, and increasing the final resolution (number of pixels) in your final image, which may be what you are looking for. This will have no effect at all on what the final image looks like, distortion, etc, so long as you are stitching with a proper stitching program which knows about these things, and not an 'ordinary' image processing application, like Photoshop. You can only use applications like Photoshop to stitch images if the angle of view is really quite narrow.
2 - Stitching
Once I get home I copy all the images onto my computer and start the process of stitching. I find it best to be a bit methodical about this and copy each individual set of 70 images into a separate folder on my hard drive and not use a photo-handling application like Photos or Lightroom. What has changed amazingly in the last few years is what happens next.
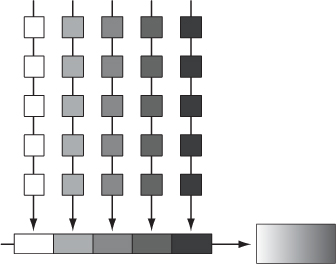
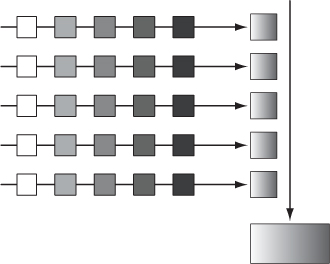
The Old School Way was to create a panorama for each exposure value, merging these into one HDR panorama, ready for tone mapping. In the beginning this was the only way, because the actual stitching tools at the time could only work with regular LDR files. This example (from the HDRI Handbook) shows the process for 5 exposures:
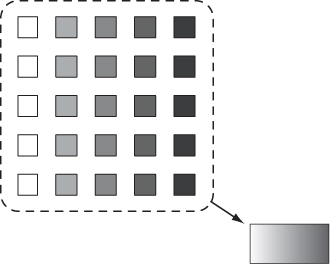
The old school way fell out of favour pretty quickly for all sorts of reasons, to be replaced with 'The Careful Way'. It just works the other way round. Create a 32-bit HDR image for each camera position. Stitch these into the final HDR 2x1 panorama much the same way as you would for any regular panorama:
The careful way is still pretty good, gives you great quality, but you need a computer with a bit of grunt to handle the big files. Typical stitching times for me were measured in tens of minutes. Now, even with modern kit, it's still a handful of minutes, not instantaneous by any means!
The New Way. You just throw all the images into the super stitching program and out pops your final 32-bit HDR image and optionally, a roughly tone-mapped image for instant use if you want as well:
If you're lucky the stitcher will work out how to blend and align all the images without any human intervention at all. This is wonderful, but you need serious computing power: tons of memory and SSD's.
Note - It's possible to add some (trade secret, and evolving 😮) processing and fine tuning to the images at various points in this workflow.
3 - Tone-Mapping
Whichever method you use you end up with a 32-bit HDR image file. This would then be Tone Mapped into the final 2:1 Equirectangular image ready to put on the internet. All the previous steps are largely mechanical, apart from deciding where and when to put the tripod of course. With tone-mapping you can be a bit creative and decide on the look of your final image that people will see. All HDR photography does is give you all the light values present at the scene and you do the actual developing bit back at home.
Note: it is being predicted that the traditional 8-bit per channel, LDR workspace will be swept aside in the future with a completely digital 32-bit, gamut free, HDR pipeline. The screens are already in place. Replacing a standard LCD white backlight with controllable coloured LEDs enable screens today to display a massive dynamic range more or less equivalent to what I can produce with my HDR workflow. In the future there will be no need to tonemap the HDR image. These screens exist now. They are the high-street shops with all sorts of propriety names and labels, usually mentioning 'deep blacks' or whatever. You won't hear HDR mentioned too much yet though. This is because all the source video is still stuck in 8-bit land, from the cameras through to the broadcasting systems.
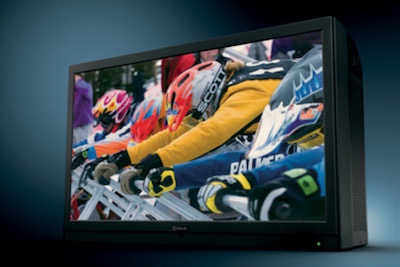
The Dolby PRM-4200 Professional Reference Monitor
4 - Preparing for Publishing
Ok, so now you have your final tone-mapped LDR image as, say, a high quality, lossless tiff file. You now have to do something with this before you can publish it, most probably onto the web. This step has lots of options. Some software out there, even in web browsers, can work with and display this image directly, so really there isn't much to do. Often though you may still want to tweak this image, add something to cover up where the tripod appeared for example, add a sponsor's logo, or other things like cool-looking control buttons, buttons to link to twitter, etc. This will mean acquiring even more specialist and obscure computing skills.
An extra step is to link more than one panorama into some kind of tour with maps, hotspots, menus, etc, so people can navigate from one panoramic node to another without having to move to a different web page.
Note: if you're a photographer whose main interest is printing then you can stop at this step. You may still have an equirectangular image, or maybe you've only shot part of the scene. You can still use some of the panoramic tools to select the part of the image you are interested in before producing your final image. It's a bit like making the composition, or making the photograph, after the event.
Another consideration is that the internet is so different now to what it was a few years ago. People are moving away from using a desktop to using their phones and tablets much more. So a big, high quality pano, great for viewing on your big screen on your desk with a superfast internet connection will be far too slow on someone's smartphone. So, there are many 'delivery systems' to choose from that can take your high quality file and present different versions to end users depending where they are and what kind of device they are using. Although this sounds complicated these authoring systems can make it all fairly straightforward.
5 - The Web
The final step is to choose where to display your work. In the past if you were doing all this for your own pleasure you'd set up and maintain your own website and have some kind of thumbnail gallery for visitors to browse. (This is what I'm doing here on this site).
If you were working to pay the mortgage then the client would use the images on their website and all you would have to do is hand over the web-ready files and cash the cheque. Their web developer would do the hard work of making it all look nice on-line.
A third way is to join an on-line community for panoramic photographers where you can get some exposure for your work alongside colleagues. One good looking site is RoundMe.
Google Maps is another consideration. It's now straightforward to post photo spheres directly to the system, even from an app on your phone. One of mine has had over 90,000 views! There is no payment involved here from Google. But you can think of it as free on-line storage and display for your library of images. I quite like this and the fact that you can navigate them all through one map window rather than lists of images on a web page.
I have up till now, tried not to spend too much time on the presenting process. I much prefer a simple interface where the images hopefully do the talking. It's the photography and image-making I enjoy, not being a web-developer! However… nowadays, there are some great systems around that can help you create good-looking sites, mobile friendly too, without taking up too much precious time.
Another development is to group lots of panoramas together so they are accessible through a map style interface rather than a list of images on a web page. This shifts the publishing/editing from the web to the tour creation software. To me this is a welcome development. My website can remain a little more static and new panoramas can simply be added to an existing collection of similar places.
The only risk with this is that new panoramas can lurk hidden in a really big collection. Thankfully I can announce or publicise a new panorama on a blog or social media as it possible to link directly to individual panoramas in a big collection if I want to.
Note: Another consideration, which has almost gone away completely, is what technology to use. A long time ago the on-line panoramas from Apple needed their propriety Quicktime plugin to work. I've always felt that forcing users to download a special plugin to view your work isn't the best idea. This problem went away when the iPod came along as most users had to instal Quicktime to make iTunes work. Over time Flash became the default player, again, most people had this already, so not really too much of an issue. These days Flash is virtually deceased, replaced by HTML 5.
So the best idea is at this moment in time is to use HTML 5 to present your work on-line. This is good because it will work in any web-browser, on the desktop or on smart phones. The few authoring tools around (I use Pano2VR) are also very much tuned into HTML 5 and are very powerful and flexible.
6 - eBooks
I'm now able to embedding panorama inside eBooks. Which then means I can potentially sell these to people so they can use them when they aren't connected to the internet.
Note: I have left out lots and lots of techie details in this workflow, any more and it would be a book, I have recommended a good one in the links page.
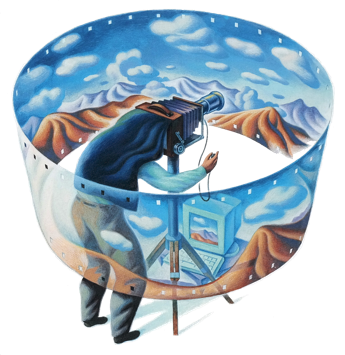
Original Apple QTVR Logo… the system that stated this journey for me and many others.
Addendum
Handled Panoramas
it''s surprisingly straightforward to make wider photos handheld.
Out and about with your pocket camera or smart-phone, you can snap away at a scene that won't fit into the viewfinder, horizontally or vertically. What I'm talking about here is where you're in a place where the built in pano function can't help. Usually somewhere where the scenery is a bit too tall, like a gorge or cave for example.
Just get lots of overlap and you can stitch the photos together into one image back home on the computer, or use a 3rd party app on your phone to do it there and then.
For the best effect:
- don't go too wide, up or down
- keep the camera in one place as much as possible (swivel it above the same spot on the ground rather than moving your arms in an arc, I sometimes use a bit of string with a stone on the end to help with this)
- don't have anything too specific close to you in the foreground
- practise to get a feel for what works for you and you'll be fine.
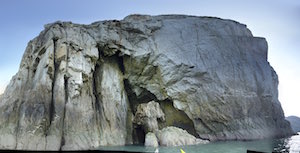
'Goes to show that it's the software that has really moved on in the last few years. 10 years ago this would have been really time-consuming and hard to do on the computer, if you could do it at all.
This time I just dropped the images into my stitching software and it did all the hard work for me, marvellous 😎.